
Difference between revisions of "UPK Explorer"
| Line 265: | Line 265: | ||
===Audio Modding=== | ===Audio Modding=== | ||
| + | |||
| + | ====Known Audio Formats ==== | ||
| + | {| class="page-normaltable pcgwikitable sortable" | ||
| + | |- | ||
| + | ! style="width: 550px" | Format !! style="width: 750px" | Status | ||
| + | |- | ||
| + | | BIK || Cannot be previewed but can be exported and imported. Requires RAD Video Tools to convert from bik to an editable format. <br> | ||
| + | |- | ||
| + | | MP3 || Can be previewed, exported and imported. <br> | ||
| + | |- | ||
| + | | OGG || Can be previewed, exported and imported. <br> | ||
| + | |- | ||
| + | | WAV || Can be previewed, exported and imported.<br> | ||
| + | |- | ||
| + | | WWise || Currently not supported. | ||
| + | |- | ||
| + | |} | ||
====How to export and import Audio files==== | ====How to export and import Audio files==== | ||
Revision as of 20:58, 21 June 2024
| Developers | |
|---|---|
| FCH823 | |
| Wastelander121 | |
| Release dates | |
| Windows | June 9, 2023[1] |
UPK Explorer is a universal Unreal Engine 3 Modding tool, with limited compatibility for some Unreal Engine 2 games. This tool is capable of editing many aspects of Unreal Engine 2/3 games including the modification of textures, object properties, meshes and materials.
Getting Started
Getting Started with UPK Explorer
- Step 1: Download UPK Explorer.
- Step 2: Extract UPK Explorer to a folder you will remember. We recommend C:\Modding Programs\Unreal\UPK Explorer.
- Step 3: Open UPK Explorer.exe
- Step 4: Set your working folder. We recommend C:\UPK Working. This is where your objects will be dumped and injected from.
Getting Started with TFC Installer
- Multiple texture packs/game patches can update the same package file. For instance, a mod that turns Robin's hair blond will not conflict with a mod that changes the colour of his suit.
- The texture pack/game patch installed last will take precedent if the same textures/object are edited in both packs.
- If you are using TFC Installer via Vortex, make sure to check for updates before installing any mods as new mods may require the latest TFC Installer in order to function correctly.
- Step 1: Download TFC Installer.
- Step 2: Extract TFC Installer to a folder you remember. We recommend C:\Modding Programs\Unreal\TFC Installer.
- Step 3: Open TFC Installer.exe
- Step 4: Select your game folder.
- Step 5: Select your mod folder.
- Step 6: Click Update [Game] or Update [DLC] or Update All.
Basic features
| Feature | Additional Information |
|---|---|
| SHA Check Bypass | Bypasses SHA checks that some games use. The exe will be patched alongside the installation of a texture pack or game patch. |
| Texture Export | Exports textures in DDS format. |
| Texture Import | Imports textures from DDS format. |
| Texture Pack Creation | Creates texture packs that can be installed with TFC Installer. |
| TOC/Uncompressed_Size Patcher | Uncompressed_size and TOC files are automatically updated when a texture pack or game patch is installed as needed. |
Advanced features
- The following features require that UPK Explorer is in "Advanced Mode".
| Feature | Additional Information |
|---|---|
| FBX Model Export | Allows the user to export Static and Skeletal meshes to FBX format from the object editor. |
| FBX Model Import (EXPERIMENTAL) | Allows the user to import Static and Skeletal meshes to FBX format from the object editor. This feature is known to be somewhat temperamental and is being updated and improved regularly. |
| Game Patch Creation | Allows for modifications of multiple game packages (mesh swaps, property edits etc) to be installed at once without needing to provide the package file to the end user. Can be installed alongside TexturePacks with TFC Installer. |
| Import Table Copy/Paste | Allows the user to copy multiple entries at once from one import table to another. |
| Import Table Editor | Allows the user to add new, remove and edit imports to the package file. |
| Material Editor | Allows the user to edit materials from within the package file. |
| Mesh Displacement | Allows the user to change the mesh origin point, allowing the mesh to move to another location relative to its original placement. |
| Mesh Preview | Allows the user to view all supported static/skeletal meshes in any given game, as well as display their package of origin. |
| Mesh Rotation | Allows the user to change the rotation of the mesh on the x,y,z axis. |
| Name Table Editor | Allows the user to rename any asset within the UPK, including longer or shorter strings. |
| Object Deletion | Allows the user to delete objects from a package file. |
| Object Import/Export | Allows the user to import and export objects to and from binary files. |
| Preserve/Import Properties | Allows the user to import, preserve or nullify specific properties from imported objects, allowing for the addition or removal of certain properties. |
| Properties Editor | Allows the user to edit the properties of classes within the UPK. |
| Sound Import | [Placeholder - Coming Soon] |
| Sound Export | [Placeholder - Coming Soon] |
Video Tutorials
- Video tutorials showcasing certain features. To request a video tutorial please ask for one either in the Youtube comments section or over on the UPK Explorer or TFC Installer Nexus pages.
| Tutorial | |
|---|---|
| Requirements and TexturePack install | |
| TexturePack and GamePatch creation |
General Tutorials
How to create a texture replacement mod
- Step 1: Within UPK Explorer, click "Open Game Folder" and select your game's install folder. For example, H:\SteamLibrary\steamapps\common\Dishonored. select the base game or DLC you wish to mod, then navigate to the "Extract Textures" tab and extract the textures you desire.
- Step 2: Navigate to your extracted textures. You will find them in UPK Working Folder. Ex; [UPK Working]\Dishonored\Exports\PF_DXT1.
- Step 3: Open the DDS files from the Exports\PF_DXT1 folder with your image editor of choice, edit them as desired, then move the textures from Exports\PF_DXT1 to Imports\PF_DXT1.
- Step 4: Within UPK Explorer, navigate to "Create Texture Pack" you should see your modified textures in the list. Click on "Create Texture Pack" at the bottom.
- Step 5: With the texture pack created, open TFC Installer, input your game folder and mod folder and click "Update".
- Step 6: To share your mod with others, all you have to do is zip up your MyMod folder. It is recommended to rename your MyMod folder to something unique beforehand so that it doesn't get overwritten by other mods.
How to convert texture mods from Texmod to TFC Installer
- Step 1: Within UPK Explorer, open your game/DLC folder and extract the required textures for the mod, for example, the skin textures for your character.
- Step 2: Use TPFExtract.exe to extract Texmod's TPF file. If extracted correctly you should now see the textures in a workable format.
- Step 3: Navigate to the textures you have extracted from UPK Explorer. You will find them in UPK Working Folder. Ex; UPK Working\Batman Arkham City\Exports\PF_DXT1.
- Step 4: Open the textures you extracted from the TPF archive with the image editor of your choice and save them as DDS, overwriting the other DDS files in your Exports folder. It's important to keep the correct pixel format.
- Step 5: Move the DDS textures to the correct pixel format folder. Eg; UPK Working\Batman Arkham City\Imports\PF_DXT1 and then, within UPK Explorer, navigate to "Create Texture Pack" you should see your modified textures in the list. Click on "Create Texture Pack" at the bottom.
- Step 6: With the texture pack created, just use TFC Installer to apply the mod.
- Step 7: To share your mod with others, all you have to do is zip up your MyMod folder. It is recommended to rename your MyMod folder to something unique beforehand so that it doesn't get overwritten by other mods.
- Only share converted mods that you yourself have made, unless you have permission from the original author to convert it on their behalf.
How to convert texture mods from Resorep/Special K to TFC Installer
- Step 1: Within UPK Explorer, open your game/DLC folder and extract the required textures for the mod, for example, the skin textures for your character.
- Step 2: Rename the numbered textures from the Resorep/Special K textures folder to the names of the ones extracted by UPK Explorer.
- Step 3: Some DDS files may need to be resaved to the correct pixel format with mipmaps generated.
- Step 4: Move the DDS textures to the correct pixel format folder. Eg; UPK Working\Batman Arkham City\Imports\PF_DXT1 and then, within UPK Explorer, navigate to "Create Texture Pack" you should see your modified textures in the list. Click on "Create Texture Pack" at the bottom.
- Step 6: With the texture pack created, just use TFC Installer to apply the mod.
- Step 7: To share your mod with others, all you have to do is zip up your MyMod folder. It is recommended to rename your MyMod folder to something unique beforehand so that it doesn't get overwritten by other mods.
- Only share converted mods that you yourself have made, unless you have permission from the original author to convert it on their behalf.
Advanced Tutorials
- All "Advanced Tutorials" will require UPK Explorer to be set to Advanced Mode or Developer Mode.
How to create single package edits
- It is recommended to back up your original files before making single package edits that replace existing files. Single package edits are recommended only for mods that add new package files, such as skins or maps.
- Step 1: Within UPK Explorer, open your package file directly with the "Open Package File" option.
- Step 2: Make your desired changes to the package and click "Save Copy".
- Step 3: Delete your original file and remove the _Copy suffix.
How to create a Game Patch
- Game patches apply texture packs and package edits such as material edits, mesh swaps and object properties at once.
- Step 1: Within UPK Explorer, open your game/DLC folder.
- Step 2: Within UPK Explorer, navigate to the package file(s) you wish to edit.
- Step 3: Make your desired changes to the UPK(s) and click "Create game patch" at the bottom of the list.
- Step 4: With the game patch created, just use TFC Installer to apply the mod.
- Step 5: To share your mod with others, all you have to do is zip up your MyMod folder. It is recommended to rename your MyMod folder to something unique beforehand so that it doesn't get overwritten by other mods.
How to add multiple entries into an Import Table at once.
- Step 1: Within UPK Explorer, open the package file you wish to copy the imports from.
- Step 2: Go to the Object Imports tab, press Control+A to select all, right click and copy.
- Step 3: Within UPK Explorer, open the package file you wish to add the imports to.
- Step 4: Open the Object Imports tab and click the paste button.
- Step 5: You may get errors about unresolved packages. To fix this, you must go to the Objects tab and add the packages and hierarchy that the import expects. Then paste again.
How to replace a name
- It is recommended not to replace names with game patches. Instead, use the add new name method and assign your new name to the object.
- Step 1: Within UPK Explorer, open your package file either via the game folder or opening the package directly.
- Step 2: Navigate to the "Names" tab.
- Step 3: Find the name you wish to replace.
- Step 4: Click the name and replace as needed.
- Step 5: Save copy.
How to add a new name
- Step 1: Within UPK Explorer, open your package file either via the game folder or the package directly.
- Step 2: Within UPK Explorer, find the object with the current name from the "Objects" tab.
- Step 3: Click the name of the object and remove the old name.
- Step 4: Type in your new name and click "Create new name" when prompted.
- Step 5: Save copy/create game patch.
How to swap binary objects
- Step 1: Within UPK Explorer, open the package with the object you wish to export.
- Step 2: Navigate to Edit Package>Objects.
- Step 3: Search for the object you are looking for. It is also recommended that you enter the class name in the search bar, along with ticking 'Exact type match' for easier navigation.
- Step 4: Once you have found your desired object, click export and then save.
- Step 5: Open the target package. This is the UPK you wish to replace the object in.
- Step 6: Navigate to the Objects tab.
- Step 7: Search for the object you are looking for. It is also recommended that you enter the class name in the search bar, along with ticking 'Exact type match' for easier navigation.
- Step 8: With the target object selected, click "Import". You may now decide which properties to import (data from the new object) and preserve (data from the original object) or you can deselect both, which will remove the property.
- Depending on the object you are importing, certain properties may need to be imported/preserved. It is recommended to try different combinations if things don't appear as they should. If unsure, preserve all and ignore any new properties being added.
How to modify SWF/GFX movie files
- A great guide to modifying SWFMovie files was created by NeverAloneInTheAsylum
- Step 1: Within UPK Explorer, open the package file you wish to modify.
- Step 2: Go to the objects tab and search by type SWF or GFX.
- Step 3: Find your desired SWF/GFX and click Export SWF.
- Step 4: Edit the SWF/GFX file inside an editing tool, we recommend JPEXS Free Flash Decompiler.
- Step 5: Once edited, export back as SWF/GFX.
- Step 6: Within UPKExplorer, click Import SWF/GFX.
- Step 7: Now that you have imported your desired SWF/GFX, click "save copy" or "create game patch".
Material Editing
How to replace textures used in your Material
Step 1: Navigate to your Material or Material Instance Constant from the object editor.
Step 2: Replace the texture references from the Textures tab.
- Some materials will be incompatible with some Pixel Formats. For example, if a material is expecting a V8U8 texture and you use a DXT1 to replace it, you may run into problems ingame.
Step 3: Save copy if editing a singular package or create game patch to save your newly edited material.
How to replace/edit properties used in your Material
Step 1: Navigate to your Material or Material Instance Constant from the object editor.
Step 2: Find the property you wish to edit, usually this will be in an array of either ScalarParameterValues or VectorParameterValues.
Step 3: Find the parameter name of the property you wish to edit; example: Cloth_Modulation_Color and change the parameter value as needed.
- Do not use TextureParameterValues for editing texture references. Doing so will not update every reference of the texture. It is recommended to do so only in the Textures tab.
FBX Modding
FBX Modding Tutorials
- Please note that Arkham Knight will need decompressed UPKs for most FBX modding. Game patches for Arkham Knight mesh mods may work but are somewhat unsupported for the time being.
How to Export FBX models from UPK Explorer
Open the UPK and go to the objects tab. Search for your mesh and if supported within UPK Explorer, you can and export it by clicking the "Export FBX" button.
- Make sure to click "Export FBX" and not "Export" - "Export" will export a .staticmesh or .skeletalmesh binary file which will be incompatible with mesh editors.
How to prepare your FBX for UPK Explorer import
1: You must have proper bone weights assigned where necessary (not needed for static meshes).
2: You must have the same skeleton/bones as the mesh you're replacing.
3: You must have a vertex count of less than 65535 (some games will allow you to have more but for most games 65535 will be the limit per mesh.)
4: You must export with the recommended settings for each program.
How to import an FBX file
- Step 1: Within UPK Explorer, open the package file you wish to modify.
- Step 2: Go to the Objects tab, search by type StaticMesh or SkeletalMesh, depending on the mesh you wish to export.
- Step 3: Find your desired mesh and click Export FBX.
- Step 4: Edit the FBX with an editor such as Maya or Blender.
- Step 5: Save the mesh with the following settings.
- Step 6: Within UPKExplorer, import the FBX you have now created by clicking "Import FBX."
- Step 7: Import the FBX file and click save copy or create game patch.
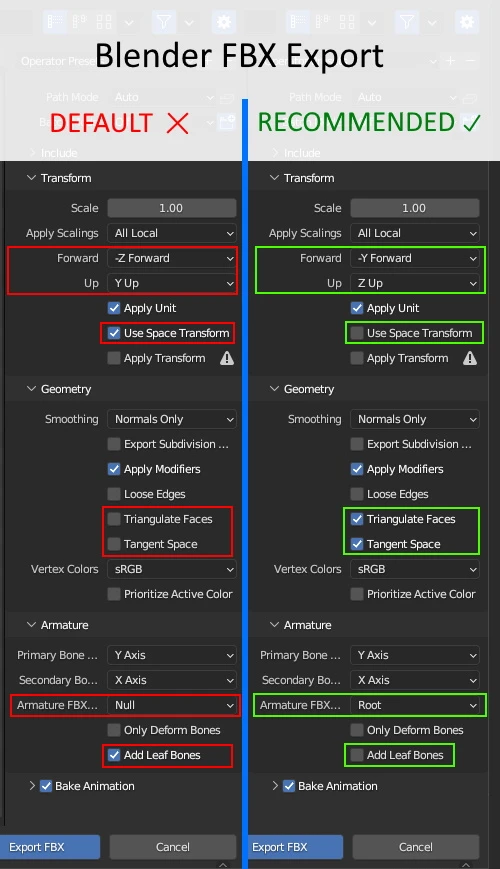
Correct FBX Export Settings
Correct FBX Export settings for Blender
Transform
- Forward: -Y Forward.
- Up: "Z Up".
- Apply Space Transform=False.
Geometry
- Triangulate Faces=True.
- Tangent Space=True.
Armature
- Armature FBX=Root.
- Add Leaf Bones=False.
Correct FBX Export settings for Maya
Geometry
- Smoothing Groups=True.
- Tangents and Binormals=True.
- It is recommended to apply smoothing and triangulation before export rather than selecting triangulation and smoothing during export.
Axis Conversion
- Up Axis=Z.
FBX File Format
- Type: Binary
- Version: FBX 2014/2015
Correct FBX Export settings for 3DS Max
Geometry
- Smoothing Groups=True.
- Tangents and Binormals=True.
- Triangulation=True.
- It is recommended to apply smoothing and triangulation before export rather than selecting triangulation and smoothing during export.
- Convert Deforming Dummies to Bones=False.
Advanced Options
Axis Conversion
- Up Axis=Z.
FBX File Format
- Type: Binary
- Version: FBX 2014/2015
Audio Modding
Known Audio Formats
| Format | Status |
|---|---|
| BIK | Cannot be previewed but can be exported and imported. Requires RAD Video Tools to convert from bik to an editable format. |
| MP3 | Can be previewed, exported and imported. |
| OGG | Can be previewed, exported and imported. |
| WAV | Can be previewed, exported and imported. |
| WWise | Currently not supported. |
How to export and import Audio files
Step 1: Open your games folder in UPK Explorer and go to the Sounds tab.
Step 2: Locate your desired audio file from the list. You will see the package it is contained in, as well as the audio format.
Step 3: Go to the create game patch tab and open the package file your audio is contained in. ex; Sounds\ObjectSnd.uax
Step 4: Click on your audio object. From here you can export the audio data. The file format will automatically be detected for you.
Step 5: Edit your audio file as desired or import a new audio file.
- Some games will be very strict when it comes to audio import. Make sure you keep the bitrate and number of channels the same as the game. For example, some games will require you to downmix to mono first or the audio file will refuse to play ingame.
Game-Specific tutorials
Batman: Arkham Tutorials
How to create a new suit slot (DLC) mod for Batman: Arkham Knight
- The following steps require that UPK Explorer is in "Advanced Mode".
- You may need to decompress your UPK files before following this guide. To decompress, use Gildor's Unreal Package Decompressor.
- The following steps may not apply to all games. For this example we will be using Batman Arkham Knight and creating a new slot for the Dark Magic Harley Quinn skin.
- Step 1 - Locating the files
- Step 2 - Extracting textures
- Step 3 - Editing textures:
- Step 4 - Injecting textures
- Step 5 - Renaming strings:
- Step 6 - Showcase_UI
- Step 7 - Renaming the UPKs
- Step 8 - DLC Subfolders
- Step 9 - The BmGame.ini file
| [Bmgame.RGameInfo]
+DLCBundlesInstalled="DarkMagicHarley"
.ShowcaseItems=( Page="Players", Item="BatmanMk2", Skin="Playable_Batman_Std", Levels="Showcase_Ambient_Background|Showcase_Players_Batmanmk2", Camera="HumanL", SortIndex=100, Unlocked=TRUE ) .ShowcaseItems=( Page="Players", Item="GothicQuinn", Skin="Playable_DLCHarleyQuinn_DMG", Levels="Showcase_Ambient_Background|Showcase_Characters_GothicHarl", Camera="HumanM", SortIndex=500, DLC=TRUE, Unlocked=TRUE ) |
- Step 10 - The GFxUI.int file
The GFxUI.int file will go inside DARKMAGICHARLEY\Localization. It should look something like this:
| [Showcase]
GothicQuinn=DARK MAGIC HARLEY QUINN SKIN GothicQuinn_Desc=The darkness within. |
- Step 11 - Showcase Icon Replacement
Now that you have your new suit slot ingame you will notice a duplicate Harley Quinn icon. To create a new one it is best to zoom in on Harley and take a screenshot. You will then want to open up the showcase_ui texture in UPK - Working\Batman Arkham Knight\Exports\PF_DXT1 and paste your screenshot over it, lining it up with the original as close as possible and save the texture with DXT1 compression, then inject as before.
- Step 12 - Sharing your mod:
To share your newly created DLC mod, simply zip the equivilent of your DARKMAGICHARLEY folder. You may also wish to create a dummy folder of the numbers, in case your mod uses assets from a particular DLC.
- It is recommended NOT to use the DLC method to replace skins as this will cause conflicts with skins that use TFC Installer. Only use TFC Installer for replacing skins.
How to create a new Batmobile slot (DLC) mod for Batman: Arkham Knight
- Step 1: Follow the same steps as for the New Suit Slot guide. This time using Playable_BatmobileName_SF.
- Step 2: Open the UPK and navigate to the object editor.
- Step 3: Find the Batmobile_BatmobileName_Archetype package and rename it to Batmobile_Rocksteady_Archetype
- Step 4: Find the BatmobileName RVehicleBatmobile object and rename it to Batmobile_Rocksteady
- Step 5: Save copy, delete original and remove _copy suffix.
Credits for this guide go to kbachani
How to create make glowing eyes for Batman: Arkham Knight
- The following steps require that UPK Explorer is in "Advanced Mode".
- You may need to decompress your UPK files before following this guide. To decompress, use Gildor's Unreal Package Decompressor.
- Step 1: Open your Arkham Knight skin's UPK.
- Step 2: Go to Edit Package>Objects.
- Step 3: Find "Batman_BM3_V2_Eye_High_D2" and "Batman_BM3_V2_Eye_High_DS_7_D2", go to the "properties" tab of both and set LODGroup to "None".
- Step 4: Find Batman_BM3_V2_eyeball_MAT_INST, scroll down until you find "Glowing Eyes On Off", set this to 1.
- Step 5: Scrolling further down, all the way at the bottom you will find "Glow Colour", "Iris_ColourInner" and "Iris_ColourOuter". Set these to your desired colour.
- A value of 1 is recommended for a comic book style of glowing eyes, values higher than 1 will over expose the bloom and may give an undesired effect.
- Step 6: Rename the "Batman_BM3_V2_eyeball_MAT_INST" as it is preloaded in the showcase menu and therefore glowing eyes will only work ingame.
- Step 7: Save UPK, delete original and remove the _copy suffix.
How to convert any UPK into a playable skin
- This guide is applicable to Arkham City, Origins and Knight.
- It is recommended to export the RAddContentPlayerCharacterMesh object from a character that has ExtraMeshes, such as Azrael.
- Step 1: Open your character's UPK.
- Step 2: Navigate to the "Object Imports" tab and add new import with the following:.
| Package=Core | Type=Class | Name=RAddContentPlayerCharacterMesh | Owner=BmGame |
- Step 3: Create a new package in the "Objects" tab, name it the same as your desired character skin eg "Playable_Batman_TwoFace
- Step 4: Import a RAddContentPlayerCharacterMesh file as a child in that new package.
- Step 5: Choose your MainMesh, BodyMesh and PhysicsAsset as desired.
- Step 6: Rename the file name string (eg "Death_TwoFace" to "Playable_Batman_TwoFace_SF".
- Step 7: Save copy and rename your copied file from "Death_TwoFace" to "Playable_Batman_TwoFace_SF"
- Step 8: Follow the new suit slot guide to turn it into a unique skin.
How to make materials invisible Batman: Arkham Knight
- Step 1: Open Arkham Knight's Startup.upk.
- Step 2: Export Character_Shared_BM3\Materials\Invisible.
- Step 3: Open your skin's .UPK.
- Step 4: Click "Import package at root" at the top left of the the Objects tab and select your exported Character_Shared_BM3.Materials.Invisible.Material."
- Step 5: Click "Import as new object, then click ok.
- Step 6: Go to your skeletalmesh files and set the desired sections to "Invisible"
How to make eyelashes invisible in Batman: Arkham Knight
- Step 1: Open the "Playable_Batman_Std_SF" UPK on Batman Arkham Knight\BmGame\CookedPCConsole.
- Step 2: Go to Edit Package>Extract Textures
- Step 3: Find "Batman_BM3_V2_Ben\Maps\Batman_BM3_V2_Wetline_R" and extract it.
- Step 4: Go to your UPK Explorer working folder, eg. "UPK Working\Batman Arkham Knight\Exports\PF_DXT1"
- Step 5: Open "Batman_BM3_V2_Ben.Maps.Batman_BM3_V2_Wetline_R.dds" on a editing program and make everything black, then save as DDS as the pixel format: DXT_1.
- Step 6: Move the modified "Batman_BM3_V2_Ben.Maps.Batman_BM3_V2_Wetline_R" to your Imports folder, eg. "UPK Working\Batman Arkham Knight\Imports\PF_DXT1"
- Step 7: Open your Arkham Knight skin's UPK.
- Step 8: Go to "Inject textures" and Inject all textures if you only have the modified "Batman_BM3_V2_Ben.Maps.Batman_BM3_V2_Wetline_R" texture.
- Step 9: Go to the Showcase UPK file of your mod and rename "Batman_BM3_V2_Wetline_Mat_INST" as it is preloaded in the Showcase and therefore it will only work in-game.
- Step 10: Save UPK, delete original and remove the _copy suffix.
How to swap Characters with New Suit Slots for Batman: Arkham Knight
- The following steps require that UPK Explorer is in "Advanced Mode".
- You may need to decompress your UPK files before following this guide. To decompress, use Gildor's Unreal Package Decompressor.
- Step 1: Open the UPK you want to convert to another character, for example, for this tutorial we will choose the Flashpoint Batman skin, we choose the UPKS with "FlashParadox" on it, "Playable_Batman_FlashParadox" and "Showcase_UI_BatmanFlashParadox"
- Step 2: Go to the Playable UPK, search "Playable_Batman_FlashParadox" and then replace with "Playable_DLCRedHood_FlashParadox", replace all then Save copy.
- Step 3: For the Showcase UI UPK, search for "Batman" then replace with "DLCRedHood", replace all and then save copy.
- Step 4: Delete the Original UPKs and remove the _copy suffix.
- Step 5: Follow the New Suit Slot guide to make it a New Suit Slot.
How to properly change the color of cape for Batman:Arkham Asylum
- Step 1: Within UPK Explorer, open your game folder and extract the textures for cape.After that edit the diffuse,normal and opacity texture in your image editor,if you are using custom model for the cape,replace the textures with your custom textures.
- Step 2: Default cape material instance is forcing diffuse texture to blend with dark blue color and extra normal maps,to prevent this happening you must assign a new material for the cape to do that follow the step 3.
- Step 3: Find a random character material that is used for hair,for example "Joker_Hair_MAT" export this material as binary and reimport it back into same path as a copy and rename it,give it a custom name such as "batman_cape_new_mat".
- Step 4: Open the material properties of the new custom material and change the "ReferencedTextures" and set the custom cape textures that you have created earlier,you can set "null" for the textures you dont need such as "Joker_Hair_Gradients".
- Step 5: Open the cape model and link the custom material to it and save it.This method is only recommended for custom models as it potentially disables the model's extra battle diffuse,opacity and detail normal texture features.
Transformers Tutorials
How to create a replacement mesh mod for Transformers: Fall of Cybertron and Rise of the Dark Spark
- The following steps require that UPK Explorer is in "Advanced Mode".
- Step 1: Within UPK Explorer, open your game folder and extract the required textures. You will also need to extract the \1 texture, if applicable.
- Step 2: Navigate to your extracted textures. You will find them in UPK Working Folder. Ex; UPK Working\Transformers Fall of Cybertron\Exports\PF_DXT5.
- Step 3: Edit them with your image editor of choice and then move the textures from Exports\PF_DXT5 to Imports\PF_DXT5.
- Step 4: Rename your texture files to match those of the ones you're replacing. Eg; TextureSets.RB_Bumblebee_Chest_TEXSET.RB_Bumblebee_Chest_TEXSET_Color_NormX and TextureSets.RB_Bumblebee_Chest_TEXSET.RB_Bumblebee_Chest_TEXSET_Masks_NormY, as well as the *..1 variants.
- Make sure that you open the textures and generate mipmaps. Exported textures only have the largest mip and won't work if just moved from Exports to Imports.
- Step 5: Within UPK Explorer, navigate to "Create Texture Pack" you should see your modified textures in the list. Click on "Create Texture Pack" at the bottom.
- Step 6: With the texture pack created, just use TFC Installer to apply the mod.
- Step 7: With the texture pack now applied, find your mesh that you want to use. In this case we're using the RB_MegatronWFC2_CHARSKEL_Chest from UI_Lobby_M.XXX.
- Step 8: Once you've found your desired mesh(es), export them.
- Step 9: Find the mesh that you are replacing. In this case we're replacing RB_Bumblebee_CHARSKEL_Chest from L01_TheExodus_BASE_m.xxx.
- Step 10: Once you've found the mesh, click import and fill in the references in red using equivalent materials from the object that you are replacing.
For example, if the reference is Exports: RB_MegatronWFC2_Chest_INST (MaterialInstanceConstant) you want to replace it with Exports[2867]: TR_BumbleBee_ROBO_p\TextureSets\RB_BumbleBee_Chest_Cust_MatINST (MaterialInstanceConstant). - Step 11: Now that your mesh is imported, click save copy at the top right. With your new file, delete the original and remove the _copy suffix from the new one.
Troubleshooting
| Problem | Solution |
|---|---|
| FBX Import: [version number] 64-bits is unsupported | Only 32 bit FBX files can be imported correctly. Please make sure that you use FBX 2014/2015 for the best results. |
| FBX Import: Mesh has no tangents | Make sure to select "Tangent Spaces" when exporting your FBX file. |
| FBX Import: Mesh has incorrect rotation/scale | Depending on the game and software used, you may have to try different combinations of rotation and scale for everything to look correct. |
| Mods not appearing ingame | Usually, this is due to the object being preloaded by another UPK. This will likely be a parent map or startup file. You can resolve this by adding new names and assigning them to your modified objects. If you are on a console, try removing installed game data (PS3) or clearing the caches and try to install your mod again. |
Game Compatibility
Compatibility categories
| Status | Additional Information |
|---|---|
| Not supported | Games not currently supported by UPK Explorer. |
| Bad | Major issues. |
| Good | Minor issues or features not working. |
| Perfect | Everything works as expected. |
Game compatibility (PC)
- Online games are not supported by UPK Explorer/TFC Installer and may carry a risk of ban.
| Game | Status | Textures | Static Mesh | Skeletal Mesh | Material | MIC | Sound | Notes | |||
|---|---|---|---|---|---|---|---|---|---|---|---|
| Abyss Odyssey | Good | Yes | Yes | Yes | Yes | Not Supported | |||||
| Adam's Venture Chronicles | Perfect | Yes | Yes | Yes | Yes | Yes | |||||
| Afterfall: InSanity | Perfect | Yes | Yes | Yes | Yes | Yes | |||||
| A Hat in Time | Perfect | Yes | Yes | Yes | Yes | Yes | |||||
| Alice: Madness Returns | Perfect | Yes | Yes | Yes | Yes | Yes | |||||
| Alien Rage | Good | Yes | Not Supported | Yes | Yes | Yes | |||||
| Aliens: Colonial Marines | Good | Yes | Yes | Yes | Yes | Yes | Not Supported | ||||
| Alpha Protocol | Perfect | Yes | Yes | Yes | Yes | Yes | |||||
| American McGee's Grimm | Perfect | Yes | Yes | Yes | Yes | Yes | |||||
| Antichamber | Perfect | Yes | Yes | Yes | Yes | Yes | |||||
| Assassin's Creed Chronicles: China | Perfect | Yes | Yes | Yes | Yes | Yes | |||||
| Assassin's Creed Chronicles: India | Perfect | Yes | Yes | Yes | Yes | Yes | |||||
| Assassin's Creed Chronicles: Russia | Perfect | Yes | Yes | Yes | Yes | Yes | |||||
| A Story about My Uncle | Perfect | Yes | Yes | Yes | Yes | Yes | |||||
| Batman: Arkham Asylum | Perfect | Yes | Yes | Yes | Yes | Yes | Yes | ||||
| Batman: Arkham City | Good | Yes | Yes | Yes | Yes | Yes | Not Supported | ||||
| Batman: Arkham Knight | Good | Yes | Yes | Yes | Yes | Yes | Not Supported | Requires decompressed UPKs if injecting higher res textures or importing larger objects. | |||
| Batman: Arkham Origins | Good | Yes | Yes | Yes | Yes | Yes | Not Supported | ||||
| The Battle of Sol | Perfect | Yes | Yes | Yes | Yes | Yes | |||||
| BioShock | Good | Yes | Not Supported | Not Supported | Not Applicable | Not Applicable | Yes | ||||
| BioShock Remastered | Good | Yes | Not Supported | Not Supported | Not Applicable | Not Applicable | Yes | ||||
| BioShock 2 | Good | Yes | Not Supported | Not Supported | Not Applicable | Not Applicable | Yes | ||||
| BioShock 2 Remastered | Good | Yes | Not Supported | Not Supported | Not Applicable | Not Applicable | Yes | ||||
| BioShock Infinite | Good | Yes | Yes | Yes | Yes | Yes | Not Supported | ||||
| BlackSite: Area 51 | Good | Yes | Not Supported | Yes | Yes | Yes | |||||
| Bombshell | Perfect | Yes | Yes | Yes | Yes | Yes | |||||
| Borderlands | Perfect | Yes | Yes | Yes | Yes | Yes | |||||
| Borderlands: Game of the Year Enhanced | Perfect | Yes | Yes | Yes | Yes | Yes | |||||
| Borderlands 2 | Good | Yes | Yes | Yes | Yes | Yes | Not Supported | UHD Texture Pack DLC is currently incompatible. | |||
| Borderlands 2 VR | Good | Yes | Yes | Yes | Yes | Yes | Not Supported | ||||
| Borderlands: The Pre-Sequel | Good | Yes | Not Supported | Yes | Yes | Yes | Not Supported | UHD Texture Pack DLC is currently incompatible. | |||
| Brothers: A Tale of Two Sons | Perfect | Yes | Yes | Yes | Yes | Yes | |||||
| Brothers in Arms: Earned in Blood | Good | Yes | Not Supported | Not Supported | Not Applicable | Not Applicable | Yes | ||||
| Brothers in Arms: Hell's Highway | Perfect | Yes | Yes | Yes | Yes | Yes | |||||
| Brothers in Arms: Road to Hill 30 | Good | Yes | Not Supported | Not Supported | Not Applicable | Not Applicable | Yes | ||||
| The Bureau: XCOM Declassified | Perfect | Yes | Yes | Yes | Yes | Yes | |||||
| Bulletstorm | Good | Yes | Not Supported | Yes | Yes | Yes | |||||
| Bulletstorm: Full Clip Edition | Perfect | Yes | Yes | Yes | Yes | Yes | |||||
| Chivalry: Medieval Warfare | Perfect | Yes | Yes | Yes | Yes | Yes | |||||
| Choplifter HD | Perfect | Yes | Yes | Yes | Yes | Yes | |||||
| Contrast | Good | Yes | Not Supported | Yes | Yes | Yes | |||||
| Damnation | Good | Yes | Yes | Yes | Yes | Yes | |||||
| Dark Void | Good | Yes | Not Supported | Yes | Yes | Yes | |||||
| Deadfall Adventures | Perfect | Yes | Yes | Yes | Yes | Yes | |||||
| Deadlight | Perfect | Yes | Yes | Yes | Yes | Yes | |||||
| The Deadly Tower of Monsters | Good | Yes | Yes | Yes | Yes | Not Supported | |||||
| Deadpool | Perfect | Yes | Yes | Yes | Yes | Yes | Yes | ||||
| Dead Man's Hand | Good | Yes | Not Supported | Not Supported | Not Applicable | Not Applicable | Yes | ||||
| Devastation | Good | Yes | Not Supported | Not Supported | Not Applicable | Not Applicable | |||||
| Doctor Who: The Eternity Clock | Perfect | Yes | Yes | Yes | Yes | Yes | |||||
| Dishonored | Good | Yes | Yes | Yes | Yes | Yes | Not Supported | ||||
| DmC: Devil May Cry | Perfect | Yes | Yes | Yes | Yes | Yes | |||||
| Dungeon Defenders | Perfect | Yes | Yes | Yes | Yes | Yes | |||||
| Dungeons & Dragons: Daggerdale | Perfect | Yes | Yes | Yes | Yes | Yes | |||||
| Tom Clancy's EndWar | Not Supported | Requires a custom parser. | |||||||||
| Enslaved: Odyssey to the West | Good | Yes | Yes | Yes | Yes | Yes | Not Supported | ||||
| Fable Anniversary | Good | Yes | Yes | Yes | Yes | Yes | Not Supported | ||||
| Flashback (2013) | Perfect | Yes | Yes | Yes | Yes | Yes | |||||
| Frontlines: Fuel of War | Good | Yes | Not Supported | Not Supported | Yes | Yes | |||||
| Gal*Gun: Double Peace | Perfect | Yes | Yes | Yes | Yes | Yes | |||||
| Game of Thrones | Perfect | Yes | Yes | Yes | Yes | Yes | |||||
| Gears of War | Good | Yes | Yes | Yes | Yes | Yes | |||||
| Gears of War: Ultimate Edition | Not Supported | Requires a custom parser. | |||||||||
| Get Even | Good | Yes | Yes | Yes | Yes | Yes | Not Supported | ||||
| Goat Simulator | Perfect | Yes | Yes | Yes | Yes | Yes | |||||
| GRAV | Good | Yes | Not Supported | Yes | Yes | Yes | |||||
| Guilty Gear Xrd -SIGN- | Not Supported | Cannot be modded due to encrypted files. | |||||||||
| Harry Potter and the Prisoner of Azkaban | Good | Yes | Not Supported | Not Supported | Not Applicable | Not Applicable | Yes | ||||
| Homefront | Good | Yes | Not Supported | Not Supported | Yes | Yes | |||||
| Hunted: The Demon's Forge | Perfect | Yes | Yes | Yes | Yes | Not Supported | |||||
| Hour of Victory | Perfect | Yes | Yes | Yes | Yes | Yes | |||||
| Injustice: Gods Among Us | Perfect | Yes | Yes | Yes | Yes | Yes | Not Supported | ||||
| Injustice 2 | Good | Yes | Not Supported | Not Supported | Not Supported | Yes | Not Supported | Requires IJ2Hook + Integrity patcher | |||
| In Verbis Virtus | Perfect | Yes | Yes | Yes | Yes | Yes | |||||
| Jacob Jones and the Bigfoot Mystery: Episode 1 | Perfect | Yes | Yes | Yes | Yes | Yes | |||||
| Jacob Jones and the Bigfoot Mystery: Episode 2 | Perfect | Yes | Yes | Yes | Yes | Yes | |||||
| Juju | Perfect | Yes | Yes | Yes | Yes | Yes | |||||
| Karateka (2012) | Perfect | Yes | Yes | Yes | Yes | Yes | |||||
| Karmaflow: The Rock Opera Videogame - Act I & Act II | Good | Yes | Yes | Yes | Yes | Yes | Not Supported | ||||
| Killer Is Dead | Perfect | Yes | Yes | Yes | Yes | Yes | |||||
| Killing Floor | Good | Yes | Not Supported | Not Supported | Not Applicable | Not Applicable | Yes | ||||
| Killing Floor 2 | Good | Yes | Not Supported | Yes | Yes | Yes | Not Supported | ||||
| King's Quest | Perfect | Yes | Yes | Yes | Yes | Yes | |||||
| Land of the Dead: Road to Fiddler's Green | Good | Yes | Not Supported | Not Supported | Not Applicable | Not Applicable | |||||
| The Last Remnant | Good | Yes | Not Supported | Yes | Yes | Yes | |||||
| Leisure Suit Larry: Box Office Bust | Perfect | Yes | Yes | Yes | Yes | Yes | Some materials have parsing issues | ||||
| Lemony Snicket's A Series of Unfortunate Events | Good | Yes | Not Supported | Not Supported | Not Applicable | Not Applicable | Yes | ||||
| Legendary | Good | Yes | Not Supported | Yes | Yes | Yes | |||||
| Life Is Strange | Good | Yes | Yes | Yes | Yes | Yes | Not Supported | ||||
| Lost Planet 3 | Good | Yes | Yes | Not supported | Yes | Yes | Not Supported | ||||
| Magic: The Gathering - Battlegrounds | Good | Yes | Not Supported | Not Supported | Not Applicable | Not Applicable | Yes | ||||
| Magrunner: Dark Pulse | Good | Yes | Yes | Yes | Not Supported | Yes | |||||
| Mass Effect | Good | Yes | Not Supported | Yes | Not Supported | Yes | |||||
| Mass Effect 2 | Good | Yes | Yes | Yes | Yes | Not Supported | |||||
| Mass Effect 3 | Bad | Yes* | Not Supported | Not Supported | Yes | Yes | Texture injection causes infinite loading screens. | ||||
| Mass Effect Legendary Edition | Bad | Not Supported | Not Supported | Not Supported | Yes | Yes | Object properties can be read, texture injection is currently broken. | ||||
| Medal of Honor (2010) | Good | Yes | Not Supported | Not Supported | Yes | Yes | Not Supported | ||||
| Medal of Honor: Airborne | Good | Yes | Yes | Yes | Yes | Yes | Not Supported | ||||
| Might & Magic Heroes VII | Not Supported | Cannot be modded due to encrypted files. | |||||||||
| Mighty No. 9 | Perfect | Yes | Yes | Yes | Yes | Yes | |||||
| MIND: Path to Thalamus | Perfect | Yes | Yes | Yes | Yes | Yes | |||||
| Mirror's Edge | Perfect | Yes | Yes | Yes | Yes | Yes | |||||
| Monday Night Combat | Perfect | Yes | Yes | Yes | Yes | Yes | |||||
| Monster Madness: Battle for Suburbia | Perfect | Yes | Yes | Yes | Yes | Yes | |||||
| Moonbase Alpha | Perfect | Yes | Yes | Yes | Yes | Yes | |||||
| Mortal Kombat Arcade Kollection | Perfect | Yes | Yes | Not Applicable | Yes | Yes | |||||
| Mortal Kombat Komplete Edition | Perfect | Yes | Yes | Yes | Yes | Yes | |||||
| Mortal Kombat X | Good | Yes | Yes | Not Supported | Not Supported | Yes | Requires MKXHook + "bDisableAssetHashChecking = true" | ||||
| Mortal Kombat 11 | Good | Yes | Not Supported | Not Supported | Not Supported | Yes | Modified textures must be the exact same resolution as umodified ones. Requires MK11Hook. | ||||
| Murdered: Soul Suspect | Good | Yes | Yes | Not Supported | Yes | Yes | Not Supported | ||||
| Outlast | Perfect | Yes | Yes | Yes | Yes | Yes | Not Supported | ||||
| Outlast 2 | Bad | Yes* | Not Supported | Yes | Not Supported | Yes | Not Supported | Textures can be edited if you remove the -SM5 suffix from TFC names. | |||
| Quantum Conundrum | Perfect | Yes | Yes | Yes | Yes | Yes | Not Supported | ||||
| QUBE | Perfect | Yes | Yes | Yes | Yes | Yes | |||||
| Q.U.B.E.: Director's Cut | Perfect | Yes | Yes | Yes | Yes | Yes | |||||
| Painkiller: Hell & Damnation | Perfect | Yes | Yes | Yes | Yes | Yes | |||||
| Papo & Yo | Perfect | Yes | Yes | Yes | Yes | Yes | Not Supported | ||||
| Postal 2 | Good | Yes | Not Supported | Not Supported | Not Applicable | Not Applicable | Yes | ||||
| Tom Clancy's Rainbow Six 3: Raven Shield | Good | Yes | Not Supported | Not Supported | Not Applicable | Not Applicable | Not Supported | ||||
| Tom Clancy's Rainbow Six: Vegas | Good | Yes | Not Supported | Not Supported | Yes | Yes | |||||
| Tom Clancy's Rainbow Six: Vegas 2 | Good | Yes | Not Supported | Not Supported | Yes | Yes | |||||
| Real Boxing | Perfect | Yes | Yes | Yes | Yes | Yes | |||||
| Red Orchestra: Ostfront 41-45 | Good | Yes | Not Supported | Not Supported | Not Applicable | Not Applicable | Yes | ||||
| The Regiment | Good | Yes | Not Supported | Not Supported | Not Applicable | Not Applicable | Yes | ||||
| Remember Me | Good | Yes | Yes | Yes | Yes | Yes | Not Supported | ||||
| Revolution 60 | Perfect | Yes | Yes | Yes | Yes | Yes | |||||
| Ride to Hell: Retribution | Perfect | Yes | Yes | Yes | Yes | Yes | |||||
| Rise of the Argonauts | Not Supported | Yes* | Yes | Yes | Yes | Yes | Game is unmoddable due Steam's integrity check. | ||||
| Rise of the Triad | Perfect | Yes | Yes | Yes | Yes | Yes | |||||
| RoboBlitz | Perfect | Yes | Yes | Yes | Yes | Yes | |||||
| Rock of Ages | Perfect | Yes | Yes | Yes | Yes | Yes | |||||
| Sanctum | Perfect | Yes | Yes | Yes | Yes | Yes | |||||
| Sanctum 2 | Perfect | Yes | Yes | Yes | Yes | Yes | |||||
| Saw | Perfect | Yes | Yes | Yes | Yes | Yes | |||||
| Scourge: Outbreak | Good | Yes | Not Supported | Yes | Yes | Yes | |||||
| Section 8: Prejudice | Perfect | Yes | Yes | Yes | Yes | Yes | |||||
| Shadow Complex Remastered | Perfect | Yes | Yes | Yes | Yes | Yes | |||||
| Sherlock Holmes: Crimes and Punishments | Good | Yes | Yes | Yes | Yes | Not Supported | |||||
| Sherlock Holmes: The Devil's Daughter | Good | Yes | Yes | Yes | Yes | Not Supported | |||||
| Shrek 2: The Game | Good | Yes | Not Supported | Not Supported | Not Applicable | Not Applicable | Yes | ||||
| Singularity | Bad | Yes* | Not Supported | Yes | Yes | Yes | Broken texture preview and injection. | ||||
| Spec Ops: The Line | Good | Yes | Yes | Yes | Yes | Yes | Not Supported | ||||
| Spider-Man 2: The Game | Good | Yes | Not Supported | Not Supported | Not Applicable | Not Applicable | Yes | ||||
| Tom Clancy's Splinter Cell | Good | Yes | Not Supported | Not Supported | Not Applicable | Not Applicable | Not Supported | ||||
| Tom Clancy's Splinter Cell: Pandora Tomorrow | Good | Yes | Not Supported | Not Supported | Not Applicable | Not Applicable | Not Supported | ||||
| Star Wars: Republic Commando | Good | Yes | Not Supported | Not Supported | Not Applicable | Not Applicable | Yes | ||||
| Stranglehold | Good | Yes | Not Supported | Not Supported | Yes | Yes | |||||
| Strike Vector | Perfect | Yes | Yes | Yes | Yes | Yes | |||||
| Styx: Master of Shadows | Perfect | Yes | Yes | Yes | Yes | Yes | |||||
| Takedown: Red Sabre | Perfect | Yes | Yes | Yes | Yes | Yes | Not Supported | ||||
| Teenage Mutant Ninja Turtles: Out of the Shadows | Perfect | Yes | Yes | Yes | Yes | Yes | |||||
| Them and Us | Perfect | Yes | Yes | Yes | Yes | Yes | |||||
| Thief 2014 | Good | Yes | Not Supported | Yes | Yes | Yes | Not Supported | ||||
| Tiny Tina's Assault on Dragon Keep: A Wonderlands One-Shot Adventure | Good | Yes | Yes | Yes | Yes | Yes | Not Supported | ||||
| Tony Hawk's Pro Skater HD | Perfect | Yes | Yes | Yes | Yes | Yes | |||||
| Tower of Guns | Perfect | Yes | Yes | Yes | Yes | Yes | |||||
| Toxikk | Perfect | Yes | Yes | Yes | Yes | Yes | |||||
| Transformers: Fall of Cybertron | Perfect | Yes | Yes | Yes | Yes | Yes | Yes | ||||
| Transformers: Rise of the Dark Spark | Perfect | Yes | Yes | Yes | Yes | Yes | Yes | ||||
| Transformers: War for Cybertron | Good | Yes | Yes | Yes | Yes | Yes | Yes | ||||
| Tron: Evolution | Perfect | Yes | Yes | Yes | Yes | Yes | Yes* | Audio is stored in loose files | |||
| Turning Point: Fall of Liberty | Perfect | Yes | Yes | Yes | Yes | Yes | |||||
| Turok | Good | Yes | Not Supported | Yes | Yes | Yes | |||||
| Unreal Tournament 3 | Perfect | Yes | Yes | Yes | Yes | Yes | |||||
| The Vanishing of Ethan Carter | Perfect | Yes | Yes | Yes | Yes | Yes | |||||
| Viscera Cleanup Detail | Perfect | Yes | Yes | Yes | Yes | Yes | |||||
| Warp | Perfect | Yes | Yes | Yes | Yes | Yes | |||||
| Wheelman | Not Supported | Requires a custom parser. | |||||||||
| Woolfe: The Red Hood Diaries | Perfect | Yes | Yes | Yes | Yes | Yes | |||||
| XCOM: Enemy Unknown | Perfect | Yes | Yes | Yes | Yes | Yes | |||||
| XCOM 2 | Good | Yes | Not Supported | Yes | Yes | Yes | Not Supported | ||||
| XCOM 2: War of the Chosen | Good | Yes | Not Supported | Yes | Yes | Yes | Not Supported | ||||
| X-Men Origins: Wolverine - Uncaged Edition | Perfect | Yes | Yes | Yes | Yes | Yes | Local texture injection only. | ||||
| Yaiba: Ninja Gaiden Z | Good | Yes | Yes | Not Supported | Yes | Yes | |||||
| Zeno Clash 2 | Perfect | Yes | Yes | Yes | Yes | Yes |
Game compatibility (PS3)
- Online games are not supported by UPK Explorer/TFC Installer and may carry a risk of ban.
| Game | Status | Textures | Static Mesh | Skeletal Mesh | Material | MIC | Additional Notes | |
|---|---|---|---|---|---|---|---|---|
| 50 Cent: Blood on the Sand | Good | Yes | Not Supported | Not Supported | Yes | Not Supported | ||
| Army of Two | Good | Yes | Not Supported | Not Tested | Not Supported | Not Supported | ||
| Asura's Wrath | Good | Yes | Yes | Not Supported | Yes | Not Supported | ||
| Batman Arkham City | Good | Yes | Yes | Yes | Yes | Yes | ||
| Batman Arkham Origins | Bad | Yes | Yes | Yes | Yes | Yes | Disc read errors ingame. | |
| Destroy All Humans: Path of the Furon | Good | Yes | Not Supported | Not Supported | Yes | Not Supported | ||
| Drakengard 3 | Good | Yes | Yes | Yes | Yes | Not Supported | ||
| Injustice | Good | Yes | Yes | Not Supported | Yes | Not Supported | ||
| Lollipop Chainsaw | Good | Yes | Not Supported | Yes | Yes | Not Supported | ||
| Mortal Kombat (2011) | Good | Yes | Yes | Not Supported | Yes | Not Supported | ||
| Mortal Kombat vs DC Universe | Good | Yes | Not Supported | Not Supported | Yes | Not Supported | ||
| Planet 51 | Good | Yes | Yes | Yes | Not Supported | Not Supported | ||
| The Punisher: No Mercy | Good | Yes | Yes | Yes | Yes | Not Supported | ||
| Thor: God of Thunder | Good | Yes | Yes | Yes | Yes | Not Supported | ||
| Transformers: Dark of the Moon | Good | Yes | Yes | Yes | Yes | Not Supported |
Game compatibility (PS4)
- Online games are not supported by UPK Explorer/TFC Installer and may carry a risk of ban.
| Game | Status | Textures | Static Mesh | Skeletal Mesh | Material | MIC | Additional Notes | |
|---|---|---|---|---|---|---|---|---|
| Batman Arkham Knight | Good | Yes | Yes | Yes | Not Supported | Yes | ||
| Borderlands: The Handsome Collection | Good | Yes | Yes | Yes | Not Supported | Not Supported | ||
| Deadpool | Good | Yes | Yes | Yes | Not Supported | Not Supported | ||
| Dishonored: Definitive Edtion | Perfect | Yes | Yes | Yes | Yes | Yes | ||
| Injustice 2 | Good | Yes | Not Supported | Not Supported | Not Supported | Not Supported |
Game compatibility (Xbox 360)
- Online games are not supported by UPK Explorer/TFC Installer and may carry a risk of ban.
| Game | Status | Textures | Static Mesh | Skeletal Mesh | Material | MIC | Additional Notes | |
|---|---|---|---|---|---|---|---|---|
| 50 Cent: Blood on the Sand | Good | Yes | Not Supported | Not Supported | Yes | Not Supported | ||
| Alice: Madness Returns | Good | Yes | Yes | Yes | Yes | Yes | ||
| Army of Two | Good | Yes | Not Supported | Not Supported | Not Supported | Not Supported | ||
| Army of Two: The 40th Day | Not Supported | Requires a custom parser. | ||||||
| Azura's Wrath | Good | Yes | Not Tested | Yes | Yes | Not Supported | ||
| Batman Arkham City | Good | Yes | Yes | Yes | Yes | Yes | ||
| Borderlands | Good | Yes | Not Supported | Not Supported | Not Supported | Not Supported | No upscaling | |
| Borderlands: The Pre-Sequel | Good | Yes | Not Supported | Yes | Yes | Yes | ||
| Borderlands 2 | Perfect | Yes | Yes | Yes | Yes | Yes | ||
| The Bourne Conspiracy | Not Supported | Requires a custom parser. | ||||||
| Bulletstorm | Good | Yes | Not Supported | Yes | Yes | Not Supported | ||
| Destroy All Humans: Path of the Furon | Good | Yes | Not Supported | Yes | Yes | Not Supported | ||
| Dishonored | Perfect | Yes | Yes | Yes | Yes | Yes | ||
| Frontlines: Fuel of War | Good | Yes | Yes | Yes | Yes | Not Supported | ||
| Gears of War 2 | Not Supported | Yes | Yes | Yes | Yes | Not Supported | Game crashes with textures injected | |
| Gears of War 3 | Good | Yes | Yes | Yes | Yes | Not Supported | ||
| Injustice | Good | Yes | Yes | Yes | Yes | Not Supported | ||
| Lollipop Chainsaw | Good | Yes | Not Supported | Yes | Yes | Not Supported | ||
| Lucha Libre AAA Heroes of the Ring | Good | Yes | Yes | Yes | Yes | Not Supported | ||
| Medal of Honor (2010) | Good | Yes | Not Supported | Not Supported | Yes | Not Supported | ||
| Mortal Kombat (2011) | Good | Yes | Yes | Yes | Yes | Not Supported | ||
| Mortal Kombat vs DC Universe | Good | Yes | Not Supported | Yes | Yes | Not Supported | ||
| Planet 51 | Good | Yes | Yes | Yes | Not Supported | Not Supported | ||
| Thor: God of Thunder | Good | Yes* | Yes | Yes | Yes | Not Supported | Cannot read from TFC files. | |
| TNA Impact | Good | Yes | Yes | Yes | Yes | Not Supported | ||
| Transformers: Dark of the Moon | Good | Yes | Yes | Yes | Yes | Not Supported | ||
| Tron Evolution | Good | Yes | Yes | Yes | Yes | Not Supported | ||
| WWE All-Stars | Good | Yes | Yes | Yes | Yes | Not Supported |
Documentation - Basic
Texture Packs
A texture pack is a package that the users of your mod will download and install with TFC Installer. It is possible for the users to install several texture packs. if more than one texture pack replace the same texture, the last one to be installed will be the one replacing the texture. TFC installer can be used to uninstall all texture packs. If your modified texture was stored in a TFC instead of a package, your texture pack will have a custom TFC that will be installed in the game directory.
If your game has official DLCs, these are also supported and it is possible to create a texture pack for a specific DLC.
Texture packs are useful if you want to replace the game's original textures with your own (ex: a HD texture pack, a base game skin replacement, that sort of thing). Texture packs are not meant to be used to create new DLCs (ex: new skins), nor to install the texture pack and upload modified packages for the end users to override their game files.
- It is recommended to not have any mods installed if you want to create a texture pack as some modding tools create packages that UPK Explorer may not be able to read properly
Texture Upscaling
If your game supports it, it is possible to upscale textures either for a texture pack or injecting textures directly into a new package. You should keep your uspcaled textures the same aspect/ratio as the original tetures and make the upscale multiples of 2x, 4x, 8x etc...
The max resolution used for textures in Unreal Engine 3 should support up to 4096.
The problem is some textures will not show up at the full 4096 pixel resolution if you do not modify your game's Engine.ini accordingly.
For example, in Dishonored, the file is located in My Documents\My Games\Dishonored\DishonoredGame\Config\DishonoredEngine.ini
You want to look for these entries (there are several): TEXTUREGROUP_World=(MinLODSize=256,MaxLODSize=2048,LODBias=0) and change them to: TEXTUREGROUP_World=(MinLODSize=256,MaxLODSize=4096,LODBias=0)
Do not do this for all entries as this seems to mess up the rendering of skies, shadows and so on. In the example above, the "World" texture groups consisted in the following entries: TEXTUREGROUP_World=(MinLODSize=256,MaxLODSize=2048,LODBias=0) TEXTUREGROUP_WorldNormalMap=(MinLODSize=256,MaxLODSize=2048,LODBias=0) TEXTUREGROUP_WorldSpecular=(MinLODSize=256,MaxLODSize=2048,LODBias=0)
Once you are done you probably want to set the file to read-only so the game does not restore the original values
Documentation - Advanced
Game Profiles
Game profiles are .xml files that can be found un the GameProfiles\ directory. They are used by both UPK Explorer and TFC installer to: - detect the game from the package version/licensee version found in the profile - map out the package folders - determine where the game's TFCs are located - determine what suffix the TFC files (Texture2D_xxx.tfc) will use. Warning: You should not modify this for the original game directories. - determine if the game exe needs to be patched for hash check (some game exe contain package names to validate with a checksum, the patcher removes these names so the packages can be modded) - enable or disable the use of TFC when generating a texture pack (so the texture pack will be generated with textures that have local only mipmaps)
When a texture pack is created, the game profiles is exported with it, and TFC installer will load that profile when the texture pack is opened.
Game profiles can also be used to exclude some packages or even directories. This is useful if you have modded files in your game installation that you do not want to be opened by UPK Explorer or modified by TFC installer.
SampleProfile.xml is provided as documentation and provides examples.
ID Remappings
Most games store the same textures as duplicate objects in several packages, for performance reasons. UPK Explorer attempts to group these identical textures together by identifying the textures using a generated name (which is group path\object name). However there are cases where the generated Id would actually group together textures that are not duplicates. This is where the IdRemappings.xml comes in. If no IdRemappings.xml can be found for your game under GameProfiles\IdRemappings, a new one will be generated when opening the game. It will log all package names as well as texture names that should not be grouped together.
When generating a texture pack, the IdRemappings is copied to the texture pack folder, and TFC installer will use it to inject the correct textures.
When you open a game with UPK Explorer that has a package that is not in the mappings file, you will be warned that your IdRemappings file might not be up to date.
There are two possibilities here: - if this is a modded package (like a new skin you downloaded), you should exclude that file from your game profile (See Game profiles instructions) - if this is an official package (following a game update...), you should delete your IdRemappings files, and the next time you will open the game, a new one will be generated for you.
- If you create a new Game Profile for a game not on the compatibility list, please send the profile and idremapping file to us so we can ensure other modders will be able to modify the game.
New Package Files
If your game supports things like custom DLCs (new skins etc...), then you'll probably want to make a new package instead of a texture pack. The users of your mod will then copy this package into the appropriate folder and follow your instructions to enable the new DLC.
It is not recommended to use this functionality to override the game's "official" packages as it will conflict with other mods. It is possible to inject textures directly into the new package, as well as modifiy object properties (such as materials, names, etc...)
Step 1: Set a working folder
The first thing to do is to set a working folder, for example c:\Workspace. This is where file will be exported to, and textures will be imported from
Step 2: Open a package
Select advanced mode, and open the package you want to work with, from your game installation folder.
From then on you can either inject textures into your package or modify object properties. Both will let you save a copy of the package. You will need to close the package and re-open it if it needs further modification (ex: after injection textures, open the copy to modify the properties)
Step 3: Inject textures (Optional)
See step 3 and 4 in "Instructions - Texture packs" about exporting and processing your textures. Click on the "Inject textures" tab. You should see your modified texture, and if you inject them in the package it will save a modified copy. No texture pack or TFC files will be created, the textures will be stored within the package to avoid conflicts with other mods in the installation folder. You should close the package at this point. If you need to modify object properties, open the newly created copy.
Step 4: Editing object properties (Optional)
Go to the package tab and you will be able to see the package content. You can edit the names table (your game may or may not support longer names) You can also edit the properties of the objects under the objects tab This is useful if you are making a new custom skin and need to update material values, as well as giving your skin a unique name. Depending on the content of your package, you may also be able to swap meshes within the same package, or even make a mod that has nothing to do with textures... This might make the game crash, or not. You will have to experiment and find out. Once you are done you can save a copy of the package. You should close the package, and if you need to inject textures into, open the newly created copy.
You can then upload this new package, and the users of your mod will not need TFC installer as your package already contains all the modified textures and properties.
Package Patches
Package patches work just like texture packs and will require TFC installer for installation.
They are highly recommended for modifying the game's original packages, as TFC installer can apply several patches to the same package, making your mod compatible with other mods that also use package patches to modify the same packages as long as the edits do not conflict with each other.
It is highly recommended to create patches from a game installation that has no game patches installed, If you do not, the users of your mod will need to install the same package patches as you have, and in the same order.
To "Create a game patch", open the game folder in advanced mode. Go to the create game patch tab and select make edits to the packages you want to modify. Each time you click the "Create a game patch" button, a .PackagePatch file will be created for each of your modified packages. You can do that every time you are done editing a package, as each .PackagePatch file is a self-contained patch for the corresponding package. That means you can also delete one of the .PackagePatch file from your game patch if you changed your mind about this package being modified.
Just like a texture pack, a game patch can also contains package patches for DLCs, or even combined main game + DLC. To do so, simply move your .PackagePatch from the main games and DLCs in the same folder to make them into a single game patch.
Package patches can also include texture packs. To do so, either move the files from your texture pack into the same folder as the game patch (xml files can be overwriten) Or use the "Create texture pack" tab, which will export the texture pack into the same directory as your game patch. When using TFC installer, the packages will be patched first, and then the textures from the texture pack will be injected into it. The reason for this is to allow you to add new texture objects to the package, and then use the texture pack part of the patch to inject textures with custom TFCs into it. To enable this feature you should create your texture pack from an already patched game so your new textures are available for the texture pack creation.
- ↑ UPK Explorer - last accessed on 2023-09-6