
PCGamingWiki:Editing guide/Screenshots
- All images used directly in wiki articles must be hosted on PCGamingWiki's servers. Images that are hosted elsewhere will be replaced by ones hosted on our servers
An often overlooked aspect of an article, screenshots provide a visual reference for tables and fixes.
Quickstart guide
Images are uploaded using the Upload Image form (can be found under the Tools menu). To include an image in a page, use a link in the following form:
Single image
{{Image|File name.png|Caption}}
- Do not include the
File:prefix in the image name as it is already included with the template. - A caption is required!
Multiple images
To include multiple images that are part of a collection, use the following format:
<gallery>
File name 1.png|Caption1
File name 2.png|Caption2
</gallery>
Standard markup for placing images on pages is supported via the [[File:]] tag, but should be avoided where possible. Custom PCGW templates, such as the previously mentioned {{Image}}, should be used instead to ensure consistency across articles.
Tools
There are countless utilities and programs that provide screen capturing/recording. Which one to use is a matter of preference, but here is a list of the major ones:
- Built-in: Most modern OSes come with rudimentary screen capture utilities or functions built-in. Compared to 3rd party solutions, they are for the most part barebones.
- Windows: Alt+Print Screen & Windows Paint combo, Snipping Tool, Game Bar (Windows 10 only)
- Alt+Print Screen captures the active window only. For the whole screen, use Print Screen.
- Windows 10 has extended functionality with screen capturing. Pressing ⊞ Win+G opens up the Game Bar, allowing for easy screen capture and recording.
- OS X: Grab
- Linux: (Varies between distributions)
- Windows: Alt+Print Screen & Windows Paint combo, Snipping Tool, Game Bar (Windows 10 only)
- Game clients: Most game client software (ex. Steam) include screen capture functionality as part of their in-game overlays. Again, compared to 3rd party programs, the functionality is barebones.
- 3rd party: Standalone utilities and applications that provide screen capturing/recording. Has the most functionality and customization available, but also the most complicated.
- Bandicam
- Dxtory
- GeForce Share (previously titled ShadowPlay)
- MSI Afterburner
- ShareX
Visual guidelines


- Screenshots should be taken at the native resolution of the monitor.
- For older games that do not support widescreen, set it to the highest possible resolution the monitor can handle (or the game can natively support, whichever comes first).
- Screenshots should show only what the game natively supports. Avoid screenshots of the game with unofficial patches or mods.
- A screenshot should show all the possible options available in that menu.
- If that is not possible (ex. menu is a scrollable list), take multiple screenshots of all the possible options and stitch them together. Some image viewers/editors come with automated functions to do such that (ex. "Create panorama image")
- The look of the UI should be consistent with other related screenshots.
- Ex. If a game is available on both Windows and Linux, all screenshots should be taken from either the Windows or Linux version but not both.
- Ex. 2: If a game supports both keyboard/mouse and gamepads, all screenshots should be taken with keyboard/mouse prompts visible or gamepad prompts visible but not both.
- The cursor should not be visible in the screenshots.
- The cursor can be hidden at the bottom-right corner of the screen.
- If the cursor cannot be hidden completely, move it as far off to the corner as possible.
- For games that have profile systems and the name is visible, use "PCGamingWiki" as the profile name.
- If the system does not support names of such length, alternatives are "PCGameWiki", "PCGWiki", and "PCGW".
- For screenshots of external launchers or options menus, the window border should be visible.
- The window must be also active (i.e. the border is not greyed out).
- Most screen capture utilities allow for the active window to be captured without the background being included.
- On Windows, pressing Alt+Print Screen will capture the active window only.
- If using Windows 10, the window border colour needs to be #556DB3 (under the Accent colour listing, which is located in the
Personalization -> Colorsmenu in Settings. DisableAutomatically pick an accent color from my background, selectCustom color -> More, paste in the hex value). This allows the screenshot to match the colour scheme of the wiki, while maintaining high contrast with text.
- If a screenshot of an external launcher or options menu must include the desktop background (either partially or fully) due to the window styling, set the desktop background to white beforehand.
- All major OSes natively support setting the background to a solid colour via the Control Panel.
- Also make sure that no desktop icons are visible in the screenshot.
- For menus dealing with video settings, max out all the options (or to the limit of the system, whichever comes first) before taking a screenshot.
- This especially needs to be done for games with active menu backgrounds rendered in real time.
- All text in screenshots should preferably be in English.
- For screenshots taken in-game it is acceptable to crop them to remove irrelevant outer areas as long as all settings of the screenshot are still visible.
What are valid screenshots?
- Options menus (external and in-game, as long as they are not junctions for other menus)
- Error messages
- Any application screenshot (only if directly related to a fix)
- Gameplay screenshots (only for comparing video settings like Field of View)
What are invalid screenshots?
- Title screens
- Options menu junctions (menu has no modifiable options, only links to other menus)
- Any screenshot with a personal watermark
- Any screenshot with applications in view that are not directly related to a fix
- Any screenshot with offensive imagery (and is not part of the game)
- Any screenshot that is not original (i.e. taken from another site or person)
Technical guidelines
General
- The recommended format is PNG in all cases.
- Never convert lossy file formats such as JPG to lossless formats such as PNG. If no alternative version of the image is available or can be created in a lossless format, using the original lossy image is preferable.
- All cover images are recommended to meet the following criteria:
- The image should be at least 282 pixels wide, ideally 564 pixels wide to accommodate high DPI screens.
- The recommended formats are PNG or SVG if available, but the image size as outlined above takes priority if a higher resolution JPG file is available.
- If a newer version of the image is available, always upload over the old image to keep the image history intact. If the name doesn't match the guidelines, it's possible to move the image to a more appropriate name. Uploading an image in a better format (PNG instead of JPG) is acceptable.
Naming and description
To prevent confusing file names, it is recommended to use the full name of the game in the file name, rather than any potential abbreviations. This way the file can still be easily recognized when it is no longer used on the page of the game. The following format is recommended:
<Game name> <Purpose>
Examples
The description of the file should include the name of the game as well as the use of the file:
[[Game name]] <Menu location (if different)> <Menu specifier (if applicable)> <Name of menu> settings <Numbering (if part of series)>
The above files follow this guideline.
Format
There are two ways to insert screenshots into an article: as an embedded image, or as part of a gallery.
Embedded

Individual screenshots should be placed at the top of the section where they are most relevant. The placement of general menu screenshots should be determined based on the included options within the scope of the wiki. For example, a Gameplay menu screenshot containing difficulty and audio options should be part of the Audio section.
Syntax
{{Image|File name|Caption}}
Embedded section breakdown
| Section | Definition | Notes |
|---|---|---|
| File name | The name of the image file. | The file extension must be included. |
| Caption | A sentence or two to identify and describe the image. | See Caption layout. |
Gallery
Using a gallery is another method available reserved mainly for multiple images in a section when embedding them the way described above would take up too much space. They are normally placed at the bottom of the main table for the relevant section.
For the rows, only two sections are present: File name and Caption. Both act in the same manner as the ones for the embedded method.
Syntax (base)
<gallery>
File name|Caption
File name|Caption
File name|Caption
</gallery>
Example
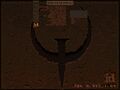
General settings for Quake
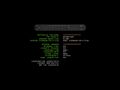
General settings for Quake II
General settings for Quake III Arena

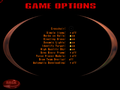
General settings for Quake 4
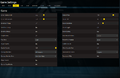
General settings for Quake Live


Caption layout
The captions for all screenshots of option menus (regardless of format) should follow this model:
<Menu location (if different)> <menu specifier (if applicable)> <Name of menu> settings <numbering (if part of series)>
General rules
- There are 3 types of menu locations:
- In-game: The menu is found while running the game. This location does not need to be mentioned if the game does not expose any settings through a launcher or an external application.
- External: The menu is found as part of an external settings program.
- Launcher: The menu is found as part of a game launcher program that must be viewed before starting the game.
- There are 2 types of menu specifiers:
- General
- Advanced
- If a menu cannot be completely captured in one screenshot and stitching them together is not an option, upload the screenshots of the menu as a "series". Add a number to each screenshot to distinguish the ordering.
- "(<current #>/<total #>)", e.g. "(3/5)"
- Use a full stop/period at the end of the caption only if it consists of more than one sentence, or is a longer caption (e.g. more than 10 words).

