Difference between revisions of "Outlast"
From PCGamingWiki, the wiki about fixing PC games
Marioysikax (talk | contribs) m (→High frame rate: streamlining with other games using same thing) |
(cleanup, added crash fix) |
||
| Line 17: | Line 17: | ||
'''General information''' | '''General information''' | ||
| + | {{mm}} [http://steamcommunity.com//sharedfiles/filedetails/?id=176247453 Guide for various tweaks] | ||
{{mm}} [http://www.gog.com/forum/outlast GOG.com Community Discussions] | {{mm}} [http://www.gog.com/forum/outlast GOG.com Community Discussions] | ||
{{mm}} [http://www.gog.com/support/outlast GOG.com Support Page] | {{mm}} [http://www.gog.com/support/outlast GOG.com Support Page] | ||
| − | |||
{{mm}} [http://steamcommunity.com/app/238320/discussions/ Steam Community Discussions] | {{mm}} [http://steamcommunity.com/app/238320/discussions/ Steam Community Discussions] | ||
| Line 27: | Line 27: | ||
{{Availability/row| Humble | outlast | DRM-free | | Steam }} | {{Availability/row| Humble | outlast | DRM-free | | Steam }} | ||
{{Availability/row| Steam | 238320 | Steam |}} | {{Availability/row| Steam | 238320 | Steam |}} | ||
| + | }} | ||
| + | |||
| + | {{DLC| | ||
| + | {{DLC/row| [http://store.steampowered.com/app/273300/ Whistleblower] | | Windows}} | ||
}} | }} | ||
==Essential improvements== | ==Essential improvements== | ||
| − | === | + | ===Skip intro videos=== |
{{Fixbox|1= | {{Fixbox|1= | ||
| − | {{Fixbox/fix| | + | {{Fixbox/fix|Delete/rename IntroLogo.bik}} |
| − | # | + | # Go to <code>{{p|game}}\OLGame\Movies\</code> |
| − | + | # Delete or rename <code>IntroLogo.bik</code> | |
| − | # | ||
| − | |||
| − | |||
}} | }} | ||
| Line 48: | Line 49: | ||
===Save game data location=== | ===Save game data location=== | ||
{{Game data| | {{Game data| | ||
| − | {{Game data/row|Windows|}} | + | {{Game data/row|Windows|{{p|steam}}\userdata\{{p|uid}}\238320\remote\}} |
}} | }} | ||
| Line 64: | Line 65: | ||
==Video settings== | ==Video settings== | ||
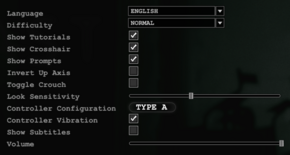
| − | [[File:OutlastGraphics.png|290px|right|thumb|Video | + | [[File:OutlastGeneral.png|290px|right|thumb|General settings.]] |
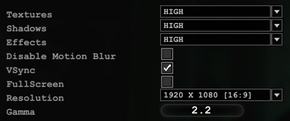
| + | [[File:OutlastGraphics.png|290px|right|thumb|Video settings.]] | ||
{{Video settings | {{Video settings | ||
|wsgf link = | |wsgf link = | ||
| Line 82: | Line 84: | ||
|fov notes = See [[#Field of view (FOV)|Field of view (FOV)]]. | |fov notes = See [[#Field of view (FOV)|Field of view (FOV)]]. | ||
|windowed = true | |windowed = true | ||
| − | |windowed notes = | + | |windowed notes = Can also be toggled with {{key|Alt|Enter}}. |
|borderless windowed = false | |borderless windowed = false | ||
|borderless windowed notes = Problems with GameCompanion. | |borderless windowed notes = Problems with GameCompanion. | ||
|anisotropic = true | |anisotropic = true | ||
| − | |anisotropic notes = | + | |anisotropic notes = Controlled by the ''Textures'' setting. |
|antialiasing = hackable | |antialiasing = hackable | ||
|antialiasing notes = See [[#Anti-aliasing (AA)|Anti-aliasing (AA)]]. | |antialiasing notes = See [[#Anti-aliasing (AA)|Anti-aliasing (AA)]]. | ||
| Line 94: | Line 96: | ||
|oculus rift notes = | |oculus rift notes = | ||
|high frame rate = hackable | |high frame rate = hackable | ||
| − | |high frame rate notes = See [[#High frame rate|High frame rate]]. | + | |high frame rate notes = Frame rate is capped at 62 FPS by default. See [[#High frame rate|High frame rate]]. |
|color blind = unknown | |color blind = unknown | ||
|color blind notes = | |color blind notes = | ||
| Line 101: | Line 103: | ||
===[[Glossary:Field of view (FOV)|Field of view (FOV)]]=== | ===[[Glossary:Field of view (FOV)|Field of view (FOV)]]=== | ||
{{Fixbox|1= | {{Fixbox|1= | ||
| − | {{Fixbox/fix| | + | {{Fixbox/fix|Edit OLGame.ini}} |
| − | # | + | # Go to the [[#Configuration file(s) location|configuration file(s) location]]. |
| − | # | + | # Open <code>OLGame.ini</code> with a text editor. |
| − | + | # To achieve an FOV of 90°, change the following lines to these values: | |
| − | + | <pre>DefaultFOV=110.0 | |
| − | < | + | RunningFOV=120.0 |
| − | + | CamcorderNVMaxFOV=110.0 | |
| − | + | CamcorderMaxFOV=110.0</pre> | |
| − | + | '''Notes''' | |
| − | <code> | + | {{ii}} To maintain the zooming out effect when running, ensure the value for <code>RunningFOV</code> is always higher than <code>DefaultFOV</code> |
}} | }} | ||
===[[Glossary:Anti-aliasing (AA)|Anti-aliasing (AA)]]=== | ===[[Glossary:Anti-aliasing (AA)|Anti-aliasing (AA)]]=== | ||
| − | |||
{{Fixbox|1= | {{Fixbox|1= | ||
| − | {{Fixbox/fix|Enable | + | {{Fixbox/fix|Enable SGSSAA using Nvidia Inspector}} |
| − | # | + | # Download and run [http://www.guru3d.com/files-details/nvidia-inspector-download.html Nvidia Inspector]. |
| − | # | + | # Click the wrench icon and search for Outlast in the profiles list. |
| − | + | # Set <code>Antialiasing compatibilty</code> to <code>0x080010C1</code> | |
| − | + | # Set <code>Antialiasing - Mode</code> to <code>Override any application setting</code> | |
| − | # | + | # Set <code>Antialiasing - Setting</code> to <code>2x</code>, <code>4x</code> or <code>8x Multisampling</code> |
| − | # | + | # Set <code>Antialiasing - Transparency supersampling</code> to <code>2x</code>, <code>4x</code> or <code>8x Sparse Grid Supersampling</code> (the level '''must''' match the previous setting). |
| − | # | + | # Set <code>Texture filtering - LOD Bias</code> to: |
| − | + | #: <code>-0.500</code> (if using 2x MSAA + 2x SGSSAA). | |
| − | # | + | #: <code>-1.000</code> (if using 4x MSAA + 4x SGSSAA). |
| − | # Apply changes. | + | #: <code>-1.500</code> (if using 8x MSAA + 8x SGSSAA). |
| + | # Click Apply to save the changes. | ||
}} | }} | ||
===[[Glossary:Frame rate (FPS)|High frame rate]]=== | ===[[Glossary:Frame rate (FPS)|High frame rate]]=== | ||
{{Fixbox|1= | {{Fixbox|1= | ||
| − | {{Fixbox/fix| | + | {{Fixbox/fix|Edit OLEngine.ini}} |
| − | # | + | # Go to the [[#Configuration file(s) location|configuration file(s) location]]. |
| − | # Open | + | # Open <code>OLEngine.ini</code> with a text editor. |
| − | # | + | # Change the second instance of <code>bSmoothFrameRate=True</code> to <code>bSmoothFrameRate=False</code>, or raise <code>MaxSmoothedFrameRate=62.000000</code> value. |
| − | # Save | + | # Save the changes. |
{{ii}} For more information, see the [[Engine:Unreal Engine 3#Smoothed frame rate|Unreal Engine 3 page]]. | {{ii}} For more information, see the [[Engine:Unreal Engine 3#Smoothed frame rate|Unreal Engine 3 page]]. | ||
}} | }} | ||
==Input settings== | ==Input settings== | ||
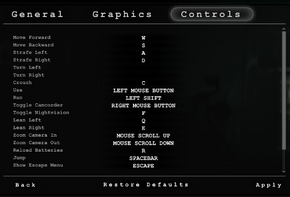
| − | [[File:OutlastControls.png|290px|right|thumb| | + | [[File:OutlastControls.png|290px|right|thumb|Key bindings.]] |
{{Input settings | {{Input settings | ||
|key remap = true | |key remap = true | ||
|key remap notes = | |key remap notes = | ||
| − | |acceleration option = | + | |acceleration option = hackable |
| − | |acceleration option notes = | + | |acceleration option notes = Smoothing can be disabled. See [[#Mouse smoothing|Mouse smoothing]]. |
|mouse menu = true | |mouse menu = true | ||
|mouse menu notes = | |mouse menu notes = | ||
| Line 155: | Line 157: | ||
|full controller notes = | |full controller notes = | ||
|controller remap = hackable | |controller remap = hackable | ||
| − | |controller remap notes = See [[#Controller | + | |controller remap notes = See [[#Controller remapping|Controller remapping]]. |
|invert controller y-axis = true | |invert controller y-axis = true | ||
|invert controller y-axis notes= | |invert controller y-axis notes= | ||
| Line 162: | Line 164: | ||
}} | }} | ||
| − | ===Controller | + | ===[[Glossary:Mouse acceleration|Mouse smoothing]]=== |
| + | {{Fixbox|1= | ||
| + | {{Fixbox/fix|Edit OLInput.ini}} | ||
| + | # Go to the [[#Configuration file(s) location|configuration file(s) location]]. | ||
| + | # Open <code>OLInput.ini</code> with a text editor. | ||
| + | # Change the first instance of <code>bEnableMouseSmoothing=true</code> to <code>bEnableMouseSmoothing=false</code> | ||
| + | # Save the changes. | ||
| + | }} | ||
| + | |||
| + | ===[[Glossary:Remapping|Controller remapping]]=== | ||
{{Fixbox|1= | {{Fixbox|1= | ||
| − | {{Fixbox/fix| | + | {{Fixbox/fix|Edit DefaultInput.ini}} |
| − | # | + | # Go to <code>{{p|game}}\OLGame\Config\</code> |
| + | # Open <code>DefaultInput.ini</code> | ||
# Scroll right to the bottom where you will find a paragraph of text starting with <code>.GPBindingsC=</code> | # Scroll right to the bottom where you will find a paragraph of text starting with <code>.GPBindingsC=</code> | ||
| − | # Edit <code>Command=" | + | # Edit <code>Command="X"</code> for each line/button in this paragraph to customize the controls, using the above paragraph starting with <code>.GPBindingsB=</code> as reference to the available commands. |
| − | # | + | # Save the changes. |
| + | # Launch the game, go to ''Options >> General'' and change ''Controller Configuration'' to ''Type C'' to use the custom layout. | ||
| − | ''' | + | '''Notes''' |
| + | {{ii}} Changing the controller layout in this fashion will also edit the shown controller map under ''Options >> General >> Controller Configuration'' for ease of use. | ||
}} | }} | ||
==Audio settings== | ==Audio settings== | ||
| − | |||
{{Audio settings | {{Audio settings | ||
|separate volume = false | |separate volume = false | ||
| Line 271: | Line 284: | ||
|fan notes = A Turkish fan patch is available [http://forum.oyunceviri.com/showthread.php?t=1409 here]. | |fan notes = A Turkish fan patch is available [http://forum.oyunceviri.com/showthread.php?t=1409 here]. | ||
}} | }} | ||
| + | }} | ||
| + | |||
| + | ==Issues fixed== | ||
| + | ===Crash on launch=== | ||
| + | {{ii}} On some 64-bit systems the game will not launch, showing a brief black window possibly with a cryptic error ''0xc000007b''. | ||
| + | {{ii}} This will instruct the game to run in 32-bit mode even on a 64-bit platform, which should work just the same but bypasses the issue with incompatible 64-bit system libraries. | ||
| + | |||
| + | {{Fixbox|1= | ||
| + | {{Fixbox/fix|Add -32 parameter|ref=<ref>[http://steamcommunity.com/app/238320/discussions/0/846963710918374718/ Fix for issues launching the game :: Outlast General Discussions]</ref>}} | ||
| + | # Right-click the game in the Steam client and choose Properties. | ||
| + | # Click Set Launch Options and add <code>-32</code> | ||
| + | # Click OK to save the changes. | ||
}} | }} | ||
==Other information== | ==Other information== | ||
| − | === | + | ===32-bit workaround=== |
{{Fixbox|1= | {{Fixbox|1= | ||
| − | {{Fixbox/fix| | + | {{Fixbox/fix|4-gigabyte tuning|ref=<ref>[http://steamcommunity.com/sharedfiles/filedetails/?id=175801311#-1 Steam Community :: Guide :: 32bit Optimization]</ref><ref>[http://msdn.microsoft.com/en-us/windows/bb613473 4-Gigabyte Tuning: BCDEdit and Boot.ini (Windows)]</ref>}} |
| − | # | + | # Open the Start menu, type <code>cmd.exe</code>, right click on it to open the context menu and click on "Run as administrator..." |
| − | # Open <code> | + | # In the console window, type <code>BCDEdit /set increaseuserva 3072</code> and press {{key|Enter}}. |
| − | # | + | # Reboot the system and start the game. |
| − | # ''' | + | |
| − | <code> | + | '''Notes''' |
| − | + | {{ii}} Bare in mind that this workaround can decrease the overall performance of the operating system after playing the game, so please revert the changes by opening an elevated command prompt, typing <code>BCDEdit /deletevalue increaseuserva</code> and rebooting the system. | |
| − | |||
}} | }} | ||
| − | === | + | ===Increase texture resolution=== |
{{Fixbox|1= | {{Fixbox|1= | ||
| − | {{Fixbox/fix| | + | {{Fixbox/fix|Edit OLEngine.ini}} |
| − | # Go to | + | # Go to the [[#Configuration file(s) location|configuration file(s) location]]. |
| − | # Open <code> | + | # Open <code>OLEngine.ini</code> in a text editor. |
| − | # | + | # Find the lines: |
| − | # | + | #: <code>MaxProcBuildingLODColorTextureSize=1024</code> |
| − | <code> | + | #: <code>MaxProcBuildingLODLightingTextureSize=256</code> |
| − | <code> | + | # Change their values to <code>2048</code> and <code>1024</code>, respectively. |
| − | <code> | + | # Save the changes. |
}} | }} | ||
| − | ===Disable | + | ===Disable quick time events=== |
{{Fixbox|1= | {{Fixbox|1= | ||
| − | {{Fixbox/fix| | + | {{Fixbox/fix|Edit DefaultGame.ini}} |
| − | # Go to | + | # Go to <code>{{p|game}}\OLGame\Config\</code> |
| − | + | # Open <code>DefaultGame.ini</code> with a text editor. | |
# Change <code>StruggleNoFail=False</code> to <code>StruggleNoFail=True</code> | # Change <code>StruggleNoFail=False</code> to <code>StruggleNoFail=True</code> | ||
| + | # Save the changes. | ||
}} | }} | ||
| Line 324: | Line 349: | ||
|recVRAM = 1 GB | |recVRAM = 1 GB | ||
}} | }} | ||
| + | |||
| + | {{ii}} 32-bit systems are not officially supported but a workaround exists (see [[#32-bit workaround|32-bit workaround]]). | ||
{{References}} | {{References}} | ||
Revision as of 08:00, 23 October 2014
 |
|
| Developers | |
|---|---|
| Red Barrels | |
| Engines | |
| Unreal Engine 3 | |
| Release dates | |
| Windows | September 4, 2013 |
Key points
- 32-bit systems are not officially supported but a workaround exists (see 32-bit workaround).
General information
- Guide for various tweaks
- GOG.com Community Discussions
- GOG.com Support Page
- Steam Community Discussions
Availability
| Source | DRM | Notes | Keys | OS |
|---|---|---|---|---|
| GOG.com | ||||
| Humble Store | ||||
| Steam |
DLC and expansion packs
| Name | Notes | |
|---|---|---|
| Whistleblower |
Essential improvements
Skip intro videos
| Instructions |
|---|
Game data
Configuration file(s) location
Template:Game data/row
| System | Location |
|---|---|
| Steam Play (Linux) | <Steam-folder>/steamapps/compatdata/238320/pfx/[Note 1] |
Save game data location
Template:Game data/row
| System | Location |
|---|---|
| Steam Play (Linux) | <Steam-folder>/steamapps/compatdata/238320/pfx/[Note 1] |
Save game cloud syncing
| System | Native | Notes |
|---|---|---|
| GOG Galaxy | ||
| Steam Cloud |
Video settings
Field of view (FOV)
| Instructions |
|---|
Anti-aliasing (AA)
| Instructions |
|---|
High frame rate
| Instructions |
|---|
Input settings
Mouse smoothing
| Instructions |
|---|
Controller remapping
| Instructions |
|---|
Audio settings
Localizations
| Language | UI | Audio | Sub | Notes |
|---|---|---|---|---|
| English | ||||
| French | ||||
| German | ||||
| Italian | ||||
| Hungarian | ||||
| Polish | ||||
| Brazilian Portuguese | ||||
| Russian | ||||
| Spanish | ||||
| Turkish |
Issues fixed
Crash on launch
- On some 64-bit systems the game will not launch, showing a brief black window possibly with a cryptic error 0xc000007b.
- This will instruct the game to run in 32-bit mode even on a 64-bit platform, which should work just the same but bypasses the issue with incompatible 64-bit system libraries.
| Instructions |
|---|
Other information
32-bit workaround
| Instructions |
|---|
Increase texture resolution
| Instructions |
|---|
Disable quick time events
| Instructions |
|---|
System requirements
| Windows | ||
|---|---|---|
| Minimum | Recommended | |
| Operating system (OS) | XP, Vista, 7, 8 | |
| Processor (CPU) | 2.2 GHz Dual Core CPU | 2.8 GHz Quad Core CPU |
| System memory (RAM) | 2 GB | 3 GB |
| Hard disk drive (HDD) | 5 GB | |
| Video card (GPU) | NVIDIA GeForce 9800GTX ATI Radeon HD 3xxx series 512 MB of VRAM | NVIDIA GTX 460 ATI Radeon HD 6850 1 GB of VRAM |
- 32-bit systems are not officially supported but a workaround exists (see 32-bit workaround).
Notes
- ↑ 1.0 1.1 File/folder structure within this directory reflects the path(s) listed for Windows and/or Steam game data (use Wine regedit to access Windows registry paths). Games with Steam Cloud support may store data in
~/.steam/steam/userdata/<user-id>/238320/in addition to or instead of this directory. The app ID (238320) may differ in some cases. Treat backslashes as forward slashes. See the glossary page for details.
References
Categories:
- Windows
- Invalid template usage (Infobox game)
- Games
- Invalid template usage (Availability)
- Invalid template usage (DRM)
- Invalid template usage (Fixbox)
- Invalid template usage (Save game cloud syncing)
- Invalid section order
- Invalid template usage (Localizations)
- Missing section (Video)
- Missing section (Input)
- Missing section (Audio)
- Missing section (API)


